Cable Management for Airflow: A Repeatable Method

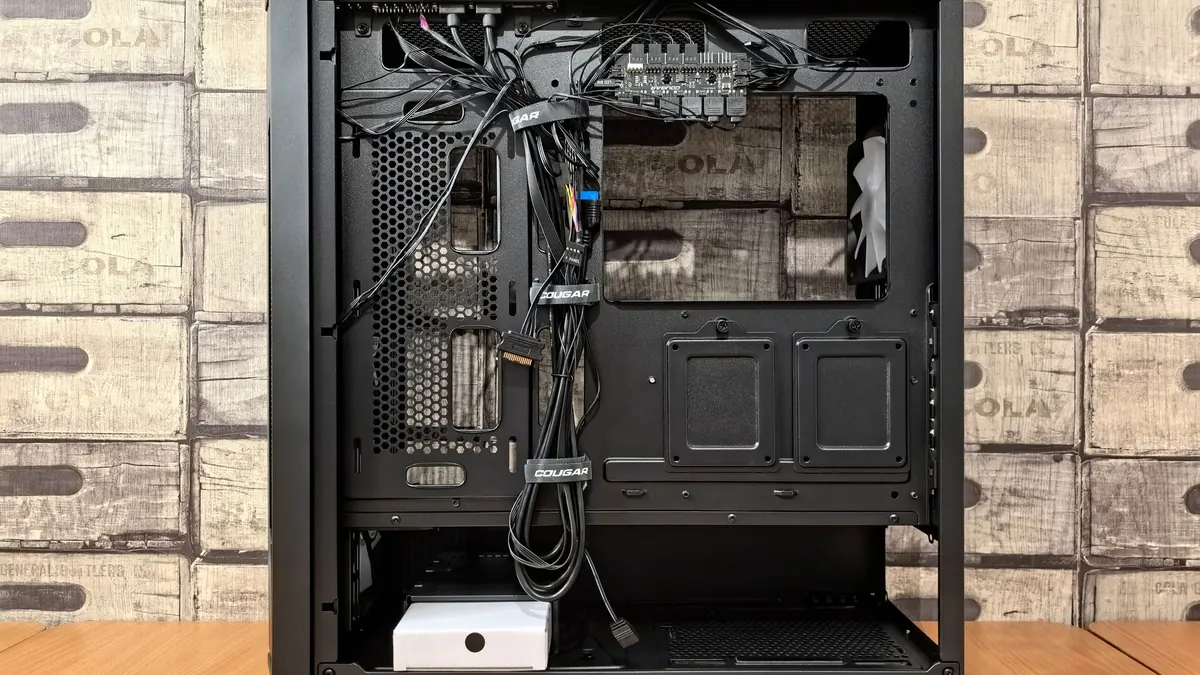
Method and part references current as of September 2026. We don't take payment for coverage — see our disclosure.
The short version
- Goal: keep the front-to-back air path clear, get every cable behind the motherboard tray, and leave the build easy to service.
- Routing order: 24-pin, EPS, then GPU power, then front-panel and USB, then fans and RGB last.
- Leave a service loop at every connector so future part swaps don't fight the bundle.
- Airflow: two front intake, one rear exhaust as a baseline; tune fan curves for slightly positive pressure.
- Realistic gain: a couple of degrees and a quieter curve — the real payoff is a build that stays tidy and predictable.
Tidy cables inside a modern case are not going to transform your temperatures. What they do is remove the dead spots and turbulence in the airflow path, keep the build serviceable, and make sure the fan curves you set actually do what you expect. Do it once, with a method, and it stays done.
This is the routing order and the tie-point plan I use on every build. It picks up right after assembly in the first-timer build guide, and it pairs with the fan curves from the first BIOS setup guide — cable routing sets up the airflow, the fan curve controls it.
Why cable management helps airflow at all
Cables in the main chamber create small pockets of still air and force intake air around them, which raises component temperatures a little and makes fans work harder for the same result. Getting them behind the tray restores a clean front-to-back path.
- Front intake to GPU: the most important path. A cable bundle hanging off the lower front panel sits right in it.
- VRM and M.2 heatsinks: benefit from unobstructed flow over the top of the board.
- Fan efficiency: less obstruction means a lower RPM hits the same temperature, which is quieter.
Common mistake: expecting a 10-degree drop. If your temps are high, the fix is usually fan count, fan placement or a mesh front panel — not tie-downs.
Route in this order
Work from the thickest, least flexible cables to the thinnest. Each one goes behind the tray, through the nearest grommet to its connector, with slack pushed to the back.
- 24-pin ATX: thickest cable, least bend. Route it behind the tray and out the grommet level with the board's 24-pin socket.
- 8-pin EPS (CPU power): up the back of the tray to the top grommet or pass-through, then to the top-left of the board. Do this before the cooler goes in if the top clearance is tight.
- GPU power (12V-2x6 or PCIe 8-pin): out the grommet nearest the slot, with a gentle bend — keep the first bend 35 mm+ from a 12V-2x6 plug.
- Front panel, USB, HD audio: route along the bottom channel, up to their headers. These are thin and flexible; save them for after the power cables set the layout.
- Fan and RGB cables: last. Daisy-chain fans where possible, run to a hub on the back of the tray, single cable to the board.
Common mistake: routing the thin cables first. The 24-pin then forces its way through and undoes your work. Thick to thin, every time.
Tie points and service loops
Anchor each cable at the case's molded tie points, and leave a short slack loop at every connector so you can unplug it later without tension.
- Use the case's built-in tie-down bar or loops. If there are none, stick-on anchor pads on the back of the tray work.
- Service loop: 20–40 mm of slack looped near each connector. A dead-tight cable pulls on the header and makes swaps a fight.
- Bundle parallel runs together, but keep fan/RGB lines slightly separate so you can trace one without unpicking the lot.
- Reusable Velcro straps over zip ties on anything you expect to change — fans, storage, GPU power.
- Trim or coil the excess of a non-modular PSU into a bay, not against a fan.
Common mistake: cinching everything bar-tight for the photo. It looks great until you add an SSD and have to cut three ties to reach the SATA power lead.
Set the fan layout for slightly positive pressure
Run a little more intake airflow than exhaust so air leaves through gaps rather than entering through them, keeping dust on the filters.
| Case size | Baseline fan setup | Add for a hot GPU / radiator |
|---|---|---|
| Mid-tower ATX | 2× front intake, 1× rear exhaust | 3rd front intake, or top exhaust |
| Airflow / mesh case | 3× front intake, 1× rear exhaust | 2× top exhaust for a top AIO |
| Small form factor | Follow the case guide; often 1 intake + 1 exhaust | Swap in higher static-pressure fans |
- Intake fans behind a filter or radiator want static-pressure designs; open exhaust spots can use airflow fans.
- Positive pressure = total intake fan output slightly above total exhaust. Two in / one out at similar RPM gets you there.
- Top-mount a radiator as exhaust in most cases; front-mount it as intake only if you accept a few degrees more on the GPU.
- Set the curves in BIOS with a response delay so brief CPU spikes don't ramp the whole case.
Common mistake: more exhaust than intake. Negative pressure sucks unfiltered dust through every seam and the interior greys over in months.
Route with the next upgrade in mind
Leave enough slack and spare capacity that adding a part later doesn't mean redoing the whole loom.
- GPU power: route it so a longer card, or a card with the connector in a different spot, still reaches without re-pulling the cable. A single extra loop behind the tray covers it.
- Spare SATA / M.2: keep one SATA power lead reachable near the drive cage and don't bury the second M.2 slot under a tied-down bundle.
- Fan headers: if you used a hub, leave one or two ports free and the hub's own cable long enough to move.
- Use reusable straps on anything you expect to touch again; save zip ties for the permanent runs like the 24-pin.
- Don't adhesive-mount cables across a panel you'll need to remove — route along the tray edge instead.
Common mistake: a perfect loom with zero slack. The first upgrade turns it into a 20-minute untangling job. Build in the slack now.
Final check before the panels go on
Close both panels and confirm nothing is fouling a fan, blocking the intake, or bulging the side panel.
- Spin each fan by hand — no cable touching a blade.
- Look down the front intake path — no bundle hanging into it.
- Fit the rear (cable-side) panel. It should close with light pressure. A bulge means the bundle is too thick or sitting too far back; spread it out or move it toward the PSU shroud.
- Power on, check every fan spins and RGB responds, then boot and watch temps for 10 minutes under load.
In our testing
Our method for measuring the cable pass: same mesh mid-tower, same Ryzen + RX 9070 build, two 20-minute runs of a combined CPU+GPU load at a fixed 22 °C ambient and a fixed fan curve. Run one is a deliberately messy build with the 24-pin, front-panel and fan cables loose in the main chamber; run two is the same hardware with every cable routed behind the tray per this method. We log steady-state GPU edge and hotspot temperature and CPU package temperature for each.
Bench in progress. We're measuring the messy-vs-managed delta for GPU edge, GPU hotspot and CPU package at an identical fan curve and ambient. This section updates with the numbers once the run is logged.
Verdict and next steps
Route thick to thin, everything behind the tray, a service loop at every plug, and a fan layout that runs slightly positive. That is the whole method, and it survives future upgrades because you built slack in.
Next: re-check your BIOS fan curves now that the airflow path is clean. Then take the tidy outside the case: our desk cable management guide handles the cables from the tower to the monitor and peripherals, and PC airflow and room placement covers where the tower should sit so the intake isn't breathing a wall or a rug.
FAQ
Does cable management actually improve airflow?
Inside a modern case the effect is small but real — a couple of degrees and a quieter curve. The bigger win is serviceability and airflow that stays predictable as you add parts.
Should a PC case run positive or negative pressure?
Slightly positive: a little more intake than exhaust, so air leaves through gaps instead of entering through them and dust stays on the filters.
How many case fans do I need?
Three for a mid-tower — two front intake, one rear exhaust. Add a fan for a hot GPU or a top radiator. Many fans at low RPM beat few fans at high RPM for noise.
Kevin has built 400+ PCs, first as a workshop technician and now leading build guides at SetupLevel. He writes the copy-and-adapt builds and the BIOS, airflow and upgrade guides.